...
Please open your email and send an email to calibration@m-engineering.us and in the Topic Line tell us what type of car and customer name such as “ 992 Turbo S, Tom Smith”. Once you have done that in the subject of the email if you hit “Ctrl+V” it will paste this info in. Please also include any vehicle modifications and what octane will be run in the car. You can then send the email to us! Once we receive it you should get a set of files with in 24 hours but most likely will be much faster if during business hours.
Step 3. Flash your car.
Once you get an email from us with the tuned files you will also get a license key.
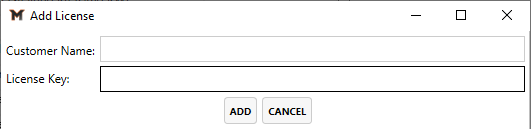
Once connected you need to open M-Tuner and use the supplied license key. This will allow you to have full access to the range of functionality of M-Tuner. You will go to “Add License”
...
And then put your name and paste the license key in. Be sure that the key does not have any spaces in front of or behind it when you paste it in or else it will give an error.
Step 4. Flashing Your ECU
M-Engineering also has unique custom features for your Porsche (no charge, available upon request). These are designed from custom code and are not available from other tuning solutions. If you are wanting to add any of these items below, please do so in your calibration request email.
Raise Rev Limiter
PSE Exhaust Valve Modifications (true ON or OFF function, no need to buy a standalone PSE valve controller)
Loud Cold Start Elimination
Auto Start/Stop Elimination
Removal of pops and burbles in sport mode
Step 3. Flashing Your ECU and Auto-Licensing your M-Tuner Software
*During the flash process, the vehicle must be in the on position but the engine off and not running*
| Note |
|---|
A battery tender is highly recommended during flashing. Do not attempt to flash your vehicle if your battery life seem low or you battery power errors on the dash. An insufficient charge can lead to a failed flash! |
File Types in M-Tuner
M-Tuner(C) - These are calibration files and are the more common file type you will be encountering. When doing calibration revisions for remote tuning these will be the type of files you will be flashing.
M-Tuner(F) - These are full binary files that are used for large feature updates! M-Tuner(F) is what also will be needed to recovery an ECU in the unlikely event a flash fails for any unforeseen reason.
Initiating a flash and auto-licensing
Flashing is a straight forward process that can take between 90 seconds to 6 minutes depending on the file type. Simple on screen prompts guide you through the process. C
Open M-Tuner and connect the OBD M-Engineering dongle to your PC via the included USB cable. The other end connects to your vehicle via the OBDII port. If you have a stable connection the “Flash ECU” button (1) will now be in bold and no longer grayed out.
Turn the vehicle to the on position but do not start the engine. A simple way to know you’re at the right point is if the tach is showing but the engine is not running. This state can be reached simply by pressing the start/stop button with your foot off of the brake pedal.
Click “Flash ECU.” (1) A directory will appear. Select the file you’d like to flash and open it.
A battery tender is highly recommend, particularly if flashing a M-Tuner(F) file.
If this is the first flash you are completing on M-Tuner, licensing of the software is needed. After you select your (F) file to flash on the car, you will be prompted to enter in your Customer Name for the license. You can simply put whatever you like in the box such as your full name and the year/make/model of the car. Once this step is complete this allows you to gain full control of reading and clearing faults as well as datalogging.
.png?version=2&modificationDate=1651691128477&cacheVersion=1&api=v2&width=306)
.png?version=2&modificationDate=1651691150508&cacheVersion=1&api=v2)
A confirmation window with map notes will now appear. Click yes to proceed. No to abort.
...
The console (2) will now display information as the flash process progresses.
As the vehicle enters the proper flash state all CAN BUS traffic will stop and modules will shut down.
You may see some communication errors regarding certain modules displayed while gaining security access, this is normal.
Once access is granted the flashing procedure will commence and a completion percentage will update in real time.
As the flash is wrapping up you may again see some communication issues with certain modules, again this is normal.
When the flash routine is finalizing modules will come back online and alarms may once again sound. This is normal.
When prompted cycle the key off and on and click ok.
The flash is now successful and you’re all set! See special precautions at the end of this section for other important data.
| Warning |
|---|
FUEL GAUGE ERROR: It’s possible that the fuel gauge may display an error after flashing, particularly cars that are low on fuel. Normally, this will go away after a drive cycle. Some cars may require you to refill your fuel if the error doesn’t go away. Make sure to fill it up all the way and not partially! |
| Warning |
|---|
It’s possible for the PAS, ACC, Drivelights, TPMS, steering wheel, or other systems to show errors after the flash process. There is nothing to be alarmed about. You can start by performing a “Clear Faults” action via M-Tuner. Driving around the car for a few miles and insuring full lock to lock with the steering wheel can help clear these faults as well. They just need some time to reset and relearn. |
ECU Recovery
In the very rare instance a flash were to fail due to low battery voltage, turning the car off during a flash, etc, we have built a recovery mode that can flash your ECU even if the flash was inhibited while in progress.
Now, if for any reason discussed above the flash fails you can now simply flash your M-Tuner(F) file to the vehicle and it will recover and you’ll be on your way.
...
The “Read & Clear Faults” buttons allows you to read Porsche specific faults in the DME as well as clear faults in all modules.
Dyno Mode
To activate dyno mode, your car must be in the key-on position with the engine off. At the top of M-Tuner, select Actuators>Porsche 992>Dyno Mode>Enable 2WD.
This will allow you to run your car on the dyno properly without traction control interfering. Once dyno mode is active, you will receive a notification on M-Tuner and the dash.
If the hazards begin blinking for any reason after a flash or key cycle, you will need to disable and reenable dyno mode.
Don’t forget to turn it off when you’re done!
...
Advanced Troubleshooting
In the event you are having issues with the M-Tuner dongle connecting to you computer and have tried basic troubleshooting such as restarting your PC, power cycling the dongle, swapping USB ports and cables, etc., you may need to install a fresh driver for the dongle.
Follow this file path location to open and run the program. C:/program files (x86)/M-Engineering/M-Tuner/openport2_setup.exe