See M-Tuner v2 Install & Directions for most recent M-Tuner.
M-Tuner is a stand alone at-home flashing/datalogging utility which you can use to port flash your ECU over OBDII, datalog at high speeds, clear faults, enable dyno mode. These instructions will guide you how to use all the features of M-Tuner
System Requirements
Windows 10
Procedure & Installation of M-Tuner
Remove and mail your ECU to M-Engineering HQ after placing an order on our website or contacting us directly.
To have access to all of the M-Tuner features, and M-Engineering calibration features, a one time bench unlock must first be performed. This process does not involve opening the case. The purpose behind the bench unlock is for stability to ensure our flashing process can not leave a vehicle immobilized due to a failed flash. If in the event an unforeseen circumstance occurs where the flashing process does not complete properly, such as walking away with the key in your pocket, insufficient battery voltage, etc, a built in recovery mode allows users to recover and reflash their ECU.
M-Engineering will perform the bench unlock procedure and mail the ECU back to you. General turnaround time is one business day. Meaning, if you send the ECU overnight on Monday, we receive it Tuesday morning, bench unlock it, & Mail it out Tuesday afternoon, and you receive the ECU back Wednesday.
The ECU will return to you with an M-Engineering flash drive that contains all the assets for M-Tuner as well as the calibration files, definitions for the datalogger, and drivers for the cable.
You can choose to run everything off of the flash drive to keep everything located in one place or move it to your desktop for easy access if you are limited by USB ports.
Install the dongle drivers by running the openport_setup.exe program. This will install the required drivers onto your PC.
After the driver’s have been installed you can now open and run M-Tuner!
Quick Start Video:
Knowing Your Way Around M-Tuner
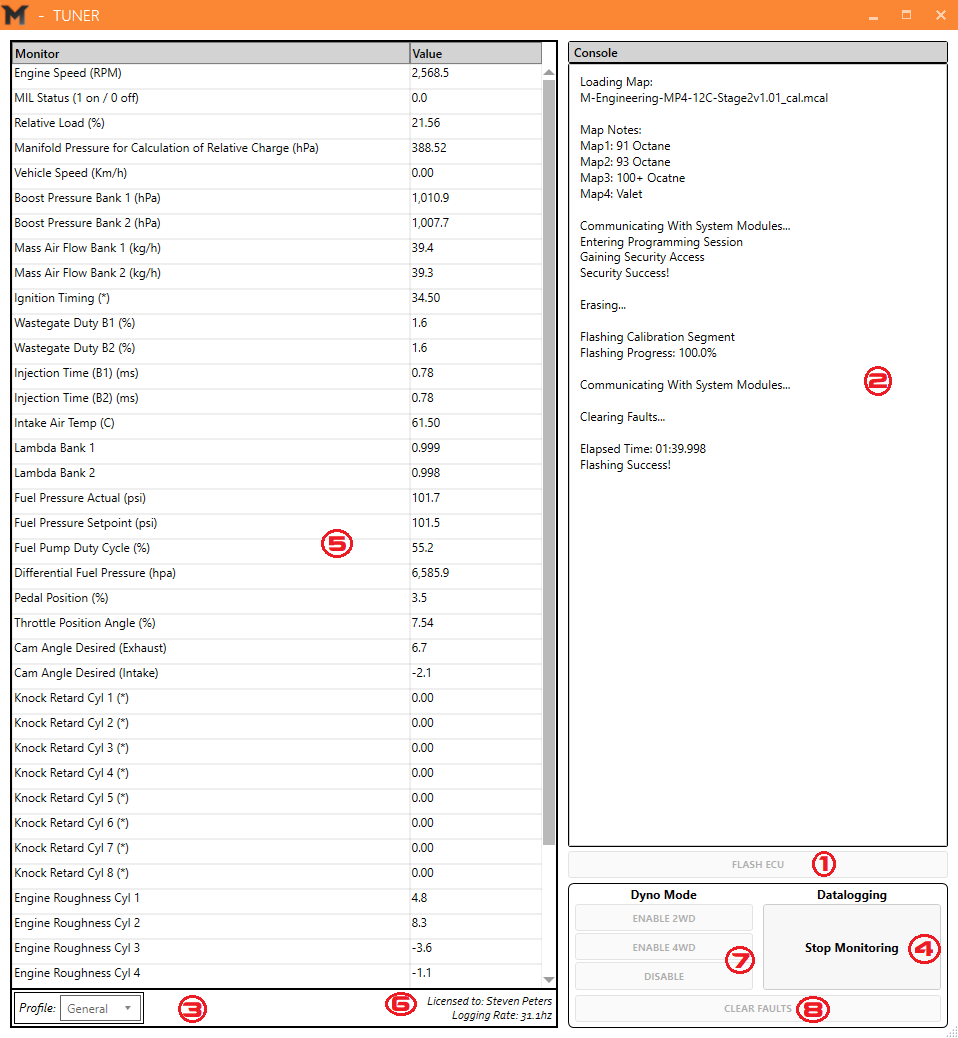
M-Tuner is devised of 8 different parts, see below for detailed information, all will activate a routine or display certain information:
Flash ECU - This button is how you activate the flash routine to change files on your ECU over OBDII
Console - This is where important flashing information is displayed in real time. Map Notes, completion percentage, etc, will be displayed here during the flash process.
Profile - Profile affords multiple different logging profiles which can be customized to cater to specific systems we are focusing on trying to improve. Every M-Tuner will come with a “General” logging profile.
Start Monitoring - This will activate live data as well as datalogging. All data displayed is subsequently recorded. Each datalog consists of .csv and .ldat files.
Live Monitoring - While data monitoring is active all of your data will be displayed here. The loggable parameters will appear here when the profile is selected, however values will not appear until you have started to monitor via the “Start Monitoring” button (4).
Logging Rate & License - Your current logging rate is displayed in this panel. When logging your sample rate is displayed in Hz. The speed can be increased up to 120hz if we are attempting to log certain systems in high resolution. The License portion displays who this particular version of M-Tuner is licensed to. Hint: This should be you:) The license allows your vehicle to communicate with M-Tuner.
Dyno Mode - This panel is where you can enable and disable dyno mode. This is required for the vehicle to run properly on any dyno.
Clear Faults - Here you can clear faults in the ECU, PCCU, ESC, and SRS modules.
Flashing Your ECU
A battery tender is highly recommended during flashing. Do not attempt to flash your vehicle if your battery life is less than 10days as displayed on the dash. An insufficient charge can lead to a failed flash!
File Types in M-Tuner
M-Tuner(C) - These are calibration files and are the more common file type you will be encountering. When doing calibration revisions for remote tuning or changing from Stage1 to Stage2 these will be the type of files you will be flashing. Flashing time takes roughly 100 seconds on the M838T cars; 140 seconds on the M840T cars.
M-Tuner(F) - These are full binary files that are used if you choose to add custom features or we make a future revision to our control strategies! M-Tuner(F) is what also will be needed to recovery an ECU in the unlikely event a flash fails for any unforeseen reason. Flashing time for full files is roughly 14 minutes for M838T; 16 minutes on the M840T.
Initiating a flash
Flashing is a straight forward process that can take between 2-16 minutes depending on the flash type discussed above and simple on screen prompts guide you through the process. First be sure to have M-Tuner open and the proper drivers installed (Run openport_setup.exe if you haven’t already). Then connect the OBD dongle to your PC via the included USB cable. The other end connects to your vehicle via the OBDII port. If you have a stable connection the “Flash ECU” button (1) will now be in bold and no longer grayed out.
Turn the vehicle to the on position but do not start the engine. A simple way to know you’re at the right point is if the tach is showing but the engine is not running. This state can be reached simply by pressing the start/stop button with your foot off of the brake pedal.
Click “Flash ECU.” (1) A directory will appear. Select the file you’d like to flash and open it.
A battery tender is highly recommend, particularly if flashing a M-Tuner(F) file.
A confirmation window with map notes will now appear. Click yes to proceed. No to abort.
Flashing Process
The console (2) will now display information as the flash process progresses.
As the vehicle enters a state to be flashed all CAN BUS traffic will stop and modules will shut down. It is normal for the dash to turn off and a few alarms to go off as this process takes place.
You may see some communication errors regarding certain modules displayed while gaining security access, this is normal.
Once access is granted the flashing procedure will commence and a completion percentage will update in real time.
As the flash is wrapping up you may again see some communication issues with certain modules, again this is normal.
As the flash routine is wrapping up and everything is coming back online alarms may sound. This is normal.
When prompted cycle the key off and on and click ok.
When you click ok the dash will go dark in the M838T vehicles for ~15 seconds as it resets. 720S owners may get a “Engine System Fault” message after a flash. If this occurs simply close all doors and hatches, take the key out of the car, and lock the vehicle. This will cure the fault.
The flash is now successful and you’re all set! See special precautions at the end of this section for other important data.
ECU Recovery
In the very rare instance a flash were to fail due to low battery voltage, turning the car off during a flash, etc, we have built a recovery mode that can flash your ECU even if the flash was inhibited while in progress.
During your first flash a local file will be saved in the folder “FlashLogs.” This file will be designated by your vin number followed by _ recovery.recf. This is a recovery file that will be utilized if a flash ever fails. Leave this file alone and do not move it out of this folder.
We also store all of these recovery files on site as part of our bench unlock procedure. So if for some reason you misplace your file we have a backup.
Now, if for any reason discussed above the flash fails you can now simply flash your M-Tuner(F) file to the vehicle and it will recover and you’ll be on your way.
If for any reason the recovery mode fails to recovery your ECU please send us an email at Info@m-engineering.us with the subject heading “M-Tuner Flash Failure” and we will assist you as soon as possible! We have yet to encounter an ECU that has not been recoverable in the field.
Precautions During and After Flashing
Since non-vital CAN traffic is silenced during this process certain items may not work while flashing. This includes the door mechanisms as well as the windows. If you find yourself locked in the car in an emergency and need to get out, there are mechanical emergency straps located near the door, over your shoulder. Give it a yank and the door will open. This is good general knowledge to know in any emergency while operating a McLaren. Flashing with the door open or windows down will not cause an issue.
After the first engine start following a flash the idle can be unstable and the lambda sensors will take 2-3 minutes to come back on line. During this time special care should be taken to not drive the car hard as closed loop fuel corrections will not take place. Simply idling it for 5 minutes after a flash is generally sufficient, however a good way to tell if the lambda sensors are active is to monitor short term fuel trims and lambda for each bank. If short term fuel trims are at 1.00 then your lambdas are not online yet. This is particularly good to know if you are tuning the car remotely on the dyno.
It is ideal to keep a battery tender on the vehicle while flashing. McLarens general all come equipped with lithium-ion batteries so be sure you are using a McLaren approved tender or one that is approved for lithium-ion batteries. Insufficient supply voltage to the ECU may result in a failed flash.
Take special care to not walk away from your vehicle with the key while it is flashing. This may cause the flash to fail.
Although the vehicle may appear to be off while flashing please resist pressing the start/stop button until prompted to do so. If this is pressed in the middle of a flash the vehicle will power down and the flash will fail.
Ensure your laptop has a sufficient charge or is hooked to outlet power before initiating a flash. If the laptop dies during the flash it may result in a failed flash.
Monitoring & Datalogging
Profile Selection
In the lower left corner of M-Tuner you will see a drop down menu named “Profile” (3)
Profile selection dictates what parameters you will be logging
All M-Tuner builds come with a “General” logging profile and logs all of the vital engine data.
Logger profile files have the extension “.lcfg”
How to Monitor / Datalog
Be sure you have installed the proper drivers delievered with your M-Tuner. openport_setup.exe will install the proper drivers if you haven’t done so.
Open M-Tuner and connect the OBD dongle to your vehicle and PC via the supplied USB cable.
If you have a profile open and a good connection to the vehicle “Start Monitor” (4), “Dyno Mode” (7), and “Clear Faults” ( 8 ) will be in bold and no longer grayed out.
“Start Monitor” (4) will now begin displaying live data in the monitor panel (5) and your logging speed (6) will be displayed near the bottom.
Whenever you start to monitor a datalog is created automatically. When you first datalog a folder called “Datalogs” will be created in the same folder as M-Tuner. This is where all datalogs are saved.
Datalogs are saved as both a .csv and a .ldat.
.csv files are files you are welcome(& encouraged) to review. Knowing what to look for in datalogs can be a great tool in early detection of an issue.
.ldat files are encrypted files that contain proprietary calibration data.
We are always available to review datalogs.
If you have a datalog you’d like us to review shoot us an email at Info@M-engineering.us with the subject header “McLaren Log Review” Please be sure to also include your VIN in the email.
How to Log:
Dyno Mode
The “Dyno Mode” buttons ( 7 ) All McLarens being run on a chassis dyno require Dyno Mode to allow for a repeatable and accurate torque and power figure. Even AWD Dynos with the dyno rollers mechanically linked, such as the MD-AWD-500 or DJ 424x Linx, require Dyno Mode for proper operation.
Enable 2WD will enable dyno mode for dynos that only have one roller or choose to dyno in RWD (RWD is often easier and safer than operating in 4WD).
Enable 4WD will enable dyno mode for dynos that operate two sets of rollers at once that are mechanically linked to spin the front tires with power supplied by the rear tires.
Disable will disable dyno mode and return the vehicle to normal operating conditions.
Dyno Mode Conditions
The following conditions must be met to enable Dyno Mode:
Ignition on
Engine on
Handling mode must be set to Normal
Vehicle Must be strapped down to Chassis Dyno
Parking Brake Released (If Dyno mode is activated with the parking brake engaged you will not be able to disengage the parking brake. You will need to disable dyno mode to disengage the brake, then re-enable Dyno Mode)
Under no circumstances is Dyno Mode to be used when not on a chassis dyno! All stability control features are disabled whilst the vehicle is in dyno mode. The parking brake is also disabled so the car can roll freely. To re-enable all factory features and the parking brake please disengage Dyno Mode.
Video Enabling Dyno Mode
Video Disabling Dyno Mode
Dyno Mode in M-Tuner
Notes
It is common for ESC Fault to appear on the dash while in Dyno Mode. When engaging dyno mode the Brake, Parking Brake, and ESC lights will come on and stay on as long as Dyno Mode is engaged.
If running the car in RWD verify that you see a change in speed on the dash when rolling the car at slow speeds. If the speed does not change from 0 dyno mode is not engaged.
The MP4-12C, 650s, & 675LT will require Dyno Mode to be engaged every key cycle. The 720s, 600LT, 570s, etc… will allow Dyno Mode to persist during key cycles.
If the wrong mode is chosen (e.g. Enable 2WD while on a 4WD dyno) the vehicle can through faults which can not be cleared immediately. The faults will need to be cleared and then the vehicle will need to go to sleep for them to fully clear. To put the vehicle to sleep close all open hatches and doors and lock the car. Remove the key from the area for roughly 15-20 minutes.
The 650s and MP4-12C do not have seperate Dyno Modes for 2WD and 4WD dynos. Both commands appear in the logger but they set the same mode.
Clear Faults
The “Clear Faults” ( 8 ) button allows you to clear faults in the following modules:
ECU - Engine Control Unit (Often referred to as the DME)
TCU - Transmission Control Unit
ESC - Electronic Stability Control
SRS - Safety Restraint System (Particularly useful for clearing an occasional errant airbag fault)
Clearing Faults: